Are you craving the authentic taste of Japanese YAKITORI but can’t always visit a specialty restaurant? You’re not alone. The distinctive smoky aroma and juicy tenderness of perfectly grilled chicken skewers have captivated food enthusiasts worldwide. As a passionate advocate for traditional Japanese cuisine, I’m excited to share professional insights that will transform your home cooking experience.
Whether you’re a culinary novice or an experienced home chef, mastering YAKITORI techniques requires understanding both fundamental principles and subtle nuances. This comprehensive guide will walk you through professional skewering secrets, optimal cooking temperatures, essential equipment, sauce preparation, and common pitfalls to avoid.
Drawing from authentic Japanese culinary traditions, these techniques have been refined over generations by master chefs who dedicate their lives to perfecting this seemingly simple yet deeply complex cooking art. By the end of this article, you’ll have the knowledge to create restaurant-quality YAKITORI in your own kitchen, impressing family and friends with your newfound skills.
Let’s embark on this culinary journey together and unlock the secrets to creating memorable YAKITORI experiences at home.
1. 7 YAKITORI Skewering Secrets Professional Chefs Use
Mastering the art of yakitori skewering elevates your grilling game from amateur to professional. These seven secrets from seasoned yakitori chefs will transform your chicken skewers into restaurant-quality masterpieces.
First, selecting the right skewers is critical. Professional chefs favor bamboo skewers that are 6-7 inches long and slightly thicker than standard grocery store versions. These provide better stability and heat resistance. Soak them in water for at least 30 minutes before use to prevent burning.
Second, uniformity is non-negotiable. Cut your chicken pieces to equal sizes—typically 1-inch cubes for thigh meat and slightly smaller for breast meat. This ensures even cooking and a consistent texture throughout.
Third, thread meat loosely rather than compacting it tightly. Professional yakitori chefs leave small spaces between pieces, allowing heat to circulate and cook the meat thoroughly while maintaining juiciness.
Fourth, the “alternate fat technique” is a game-changer. When skewering, alternate lean meat with small pieces of chicken skin or fat. This natural basting method keeps the skewer moist and adds incredible flavor depth.
Fifth, master the “double-skewer method” for difficult items like chicken hearts or liver. Using two parallel skewers prevents delicate ingredients from spinning when you turn them on the grill—a technique employed at renowned establishments like Torishiki in Tokyo.
Sixth, professional chefs always skewer against the grain of the meat. This shortens muscle fibers, resulting in more tender bites that are easier to pull off the skewer when eating.
Finally, the secret “partial skewer” technique: for items like tsukune (chicken meatballs), only insert the skewer halfway through. This creates a surface that caramelizes beautifully when dipped in tare sauce during cooking.
Implementing these professional skewering techniques requires practice, but the results will astonish your guests. Pair these methods with high-quality ingredients and proper grilling temperatures for authentic yakitori that rivals Japan’s finest yakitori-ya establishments.
2. The Ultimate YAKITORI Cooking Temperature Guide: From Charcoal to Electric Grills
Achieving perfectly grilled yakitori depends largely on mastering temperature control. While traditional yakitori shops in Japan use specialized binchotan charcoal reaching temperatures of 800-1000°F (427-538°C), home cooks can still achieve excellent results with proper technique.
For traditional charcoal grills, aim for a medium-hot fire with white-hot coals and minimal flames. The ideal cooking zone is about 4-6 inches above the coals, where the temperature ranges between 375-450°F (190-232°C). This heat zone allows for proper rendering of fat while developing a beautiful caramelized exterior without burning.
Gas grill enthusiasts should preheat to medium-high (around 400-450°F/204-232°C) and utilize direct heat. The advantage of gas grills is consistent temperature, though you’ll miss some of the smoky complexity that charcoal provides. To compensate, consider adding soaked wood chips in a smoker box.
For those using konro grills (the small rectangular Japanese grills), start with a smaller amount of binchotan charcoal than you think necessary. These efficient grills maintain high heat with minimal fuel, and the narrow design concentrates heat perfectly for yakitori skewers.
Electric grills and indoor options work surprisingly well for yakitori. Set your electric grill to 400°F (204°C) and ensure skewers are positioned to catch maximum heat. The Zojirushi Electric Grill and the Cuisinart Griddler are excellent options that provide consistent results.
Temperature timing is equally important – most yakitori items need only 3-4 minutes per side for chicken, while denser items like tsukune (chicken meatballs) require 5-6 minutes per side. Remember that carryover cooking will continue after removal, so slight undercooking ensures juicy results.
For ingredients like negima (chicken and scallion), manage temperature zones carefully, as vegetables cook faster than meat. Position skewers so vegetables receive slightly less direct heat than meat portions.
A reliable instant-read thermometer like the Thermapen or ThermoPro will revolutionize your yakitori game. Chicken should reach 165°F (74°C) internally, while you can serve chicken hearts and livers at a slightly lower temperature of 160°F (71°C) for optimal texture.
By understanding these temperature guidelines across different cooking equipment, you’ll develop consistent, restaurant-quality yakitori regardless of your chosen heat source.
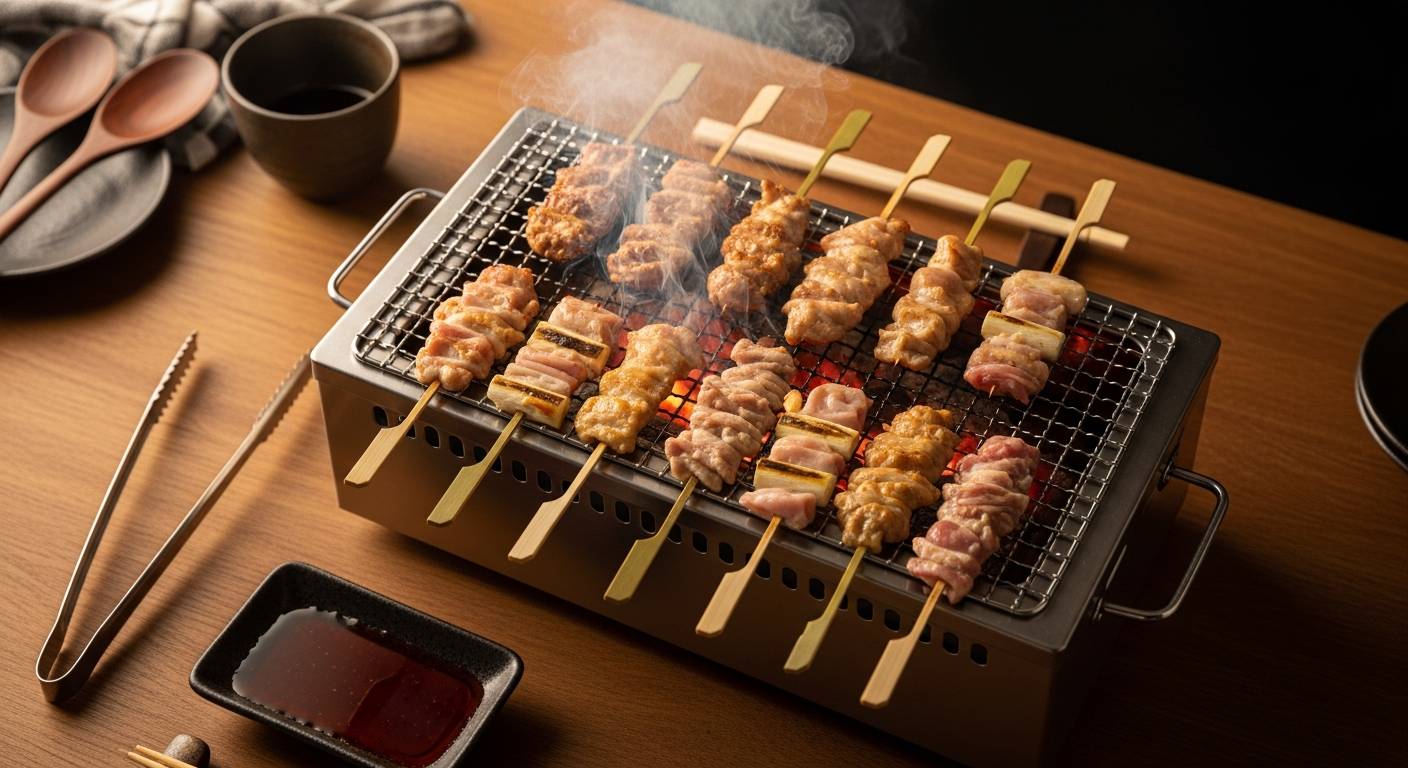
3. Must-Have YAKITORI Tools: Building Your Home Skewer Station
Creating an authentic yakitori experience at home requires the right tools. While professional yakitori chefs train for years to perfect their craft, you can achieve impressive results with proper equipment. Let’s explore the essential tools needed to build your home yakitori skewer station.
The foundation of any yakitori setup is the grill. Traditional Japanese restaurants use rectangular konro grills made from diatomaceous earth, which retain heat exceptionally well. The Korin Konro Grill and KINKA Charcoal Grill are excellent options for serious enthusiasts. For beginners, a narrow hibachi-style grill provides adequate heat concentration without the investment. Even a standard Weber kettle grill can be modified with fire bricks to create a makeshift yakitori lane.
Next, invest in proper yakitori skewers. Traditional skewers (kushi) are made from bamboo or metal. Bamboo skewers are affordable but require soaking before use to prevent burning. For regular use, consider stainless steel or iron skewers, which offer durability and consistent results. Look for flat-sided skewers that prevent meat from spinning during cooking – Matsukiyo and Yaruki brands produce excellent options with comfortable handles.
Binchotan charcoal is the soul of yakitori cooking. This white charcoal burns at a consistent high temperature with minimal smoke, allowing the pure flavor of the chicken to shine. While premium Japanese binchotan can be expensive, Thai or Vietnamese alternatives offer good performance at a lower price point. For beginners, lump hardwood charcoal is an acceptable substitute.
Other essential tools include:
– Kitchen shears for trimming meat and portioning chicken
– A sharp knife (preferably a Japanese deba) for butchering
– Small metal tongs for handling skewers
– Cooling racks for resting cooked skewers
– A digital thermometer for checking doneness
The tare sauce brush is another crucial component. Traditional yakitori shops use a brush made from leek stems, but a silicone brush works well for home cooks. This brush applies the sweet-savory tare sauce that gives many yakitori styles their distinctive flavor.
Organization is key for efficient yakitori grilling. A dedicated station with your prepped ingredients, skewers, and sauces allows for smooth workflow. Consider adding a small cutting board, prep containers, and a hand towel to your setup.
For those serious about yakitori, a specialty ceramic bowl for tare sauce completes the authentic experience. These bowls maintain sauce temperature and have a design that prevents cross-contamination when basting multiple skewers.
With these tools assembled, your home yakitori station will be ready to produce restaurant-quality grilled skewers. The initial investment may seem substantial, but quality equipment will last for years of delicious yakitori sessions.
4. Mastering Tare Sauce: The Hidden Element of Perfect Home YAKITORI
The soul of authentic yakitori lies not just in the grilling technique but in the magical glaze that coats each skewer – the tare sauce. This sweet-savory elixir transforms simple grilled chicken into an unforgettable culinary experience. While many home cooks focus on skewering and grilling methods, mastering tare sauce is often the overlooked secret to restaurant-quality yakitori.
Traditional yakitori tare combines four fundamental ingredients: soy sauce, mirin, sake, and sugar. The ratio of these elements creates the perfect balance between sweet, salty, and umami flavors. For a basic tare, combine 1 cup soy sauce, 1 cup mirin, ½ cup sake, and ¼ cup brown sugar in a saucepan. Simmer gently for 10-15 minutes until slightly thickened, allowing the flavors to meld and intensify.
For depth and complexity, consider adding aromatics during the simmering process. Sliced ginger, crushed garlic cloves, green onion whites, and chicken bones (particularly wing tips) infuse the sauce with layers of flavor. These additions should be strained out before using the sauce for basting.
The application technique is crucial – proper tare brushing should occur during the final stages of grilling. A dedicated natural-bristle brush allows for even coating without disturbing the char. Apply the tare in thin, multiple layers rather than a single heavy coating. This creates a beautiful lacquered finish and prevents burning.
Many yakitori masters maintain their tare pots for years, continually adding fresh ingredients to a base that grows more complex over time. For home cooks, storing excess tare in a glass container in the refrigerator allows you to develop your own “master sauce” that improves with each use.
Beyond chicken, your homemade tare can elevate other grilled proteins and vegetables. Try it on grilled eggplant, mushrooms, or even as a flavor booster in stir-fries. The versatility of this sauce makes it a valuable addition to your culinary arsenal.
Equipment-wise, invest in a small, dedicated saucepan and basting brush used exclusively for tare preparation and application. Cross-contamination can introduce unwanted flavors and compromise food safety.
Remember that regional variations exist throughout Japan – Tokyo-style tare tends to be sweeter, while Osaka variants often incorporate more salt and umami elements. Experimenting with these regional differences allows you to discover your personal preference and signature style.
5. 5 Common YAKITORI Mistakes and How to Avoid Them
Making authentic yakitori at home can be a rewarding experience, but even experienced cooks make some common mistakes. Avoiding these pitfalls will help you create restaurant-quality skewers every time. Let’s explore the five most common yakitori mistakes and how to prevent them.
First, using the wrong type of skewers can ruin your yakitori experience. Metal skewers conduct heat too quickly and can lead to overcooking, while thin bamboo skewers burn easily. Solution: Use medium-thickness bamboo skewers (3-4mm) and soak them in water for at least 30 minutes before grilling. For frequent yakitori cooking, consider investing in specialized flat yakitori skewers that prevent meat from rotating.
Second, many home cooks cut chicken pieces inconsistently. Uneven chunks cook at different rates, resulting in some pieces being overcooked while others remain raw. Solution: Cut all pieces to a uniform size (approximately 1-inch cubes) and thread them onto skewers with minimal space between pieces to ensure even cooking.
Third, improper grill management leads to temperature fluctuations. Yakitori requires steady, high heat to develop proper caramelization without drying out. Solution: If using charcoal, create a bed of evenly distributed hot coals before cooking. For gas grills, preheat thoroughly on medium-high. Consider investing in a binchotan charcoal grill for authentic results.
Fourth, over-saucing is a common error that causes flare-ups and burnt yakitori. Solution: Apply tare (sauce) only during the final stages of cooking, using a brush to apply thin, even layers. Allow each layer to caramelize slightly before adding more.
Finally, inadequate resting time after cooking prevents juices from redistributing. Solution: Rest yakitori for 1-2 minutes after removing from heat. This allows the internal temperature to stabilize and juices to settle, resulting in more tender and flavorful chicken.
By avoiding these common mistakes, your homemade yakitori will rival your favorite izakaya. The combination of properly prepared ingredients, appropriate equipment, and correct technique transforms simple chicken skewers into a memorable culinary experience that captures the essence of Japanese street food.
この記事へのコメントはありません。